Diamond Casino Heist: Master The Big Con Approach!
Heist Practice Tasks
We’ll start by going over every significant prep mission you must do, aside from the obviously required ones. Take note that you can work on these preparation tasks for heists alone or with others. However, you’ll get much faster and easier results if you work on them with at least one person. That being said, completing the prep missions by yourself is not insurmountable. The preparatory tasks can also be completed in group or solitary settings.
Assist Staff
Man with a gun
Since you won’t be engaging in battle, you don’t need to worry about selecting the greatest gunner for this strategy. It’ll be an easy “in-and-out” strategy. You shouldn’t need any firearms because you’ll be employing disguises to enter and exit. As a result, you can go with Karl Abolaji, who just keeps 5% of the profit. Make sure you select the Micro SMG loadout when selecting your weapons in case the theft doesn’t go as planned. The shotgun loadout causes very little to no damage, so avoid using it.
Driver
As you won’t be employing the getaway car for this technique, you also don’t need your driver. However, hiring a driver is required, so you can go with KARIM DENZ, who just gets a 5% cut. The Sentinel Classic getaway cars are an option if you choose to employ the getaway cars, which are not necessary if you’re following this tutorial. If you do choose to use the cars, be careful to improve them to Level 3 at the arcade garage by upgrading while seated in the vehicle.
Operator
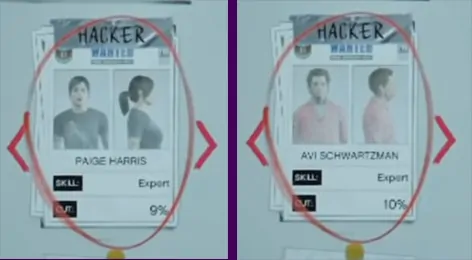
Choosing a hacker is the most important thing in this whole prep. You need to make sure you choose the best hacker in the list since the time you get inside the vault is based on the hacker you choose. Choose either PAIGE HARRIS or AVI SCHWARTZMAN if you’ve unlocked him. If you want to know how to unlock Avi Schwartzman you can check our full guide here.
If you choose PAIGE, you will get a total of 3 minutes and 15 seconds in the vault and she takes 9% of the cut. If you choose AVI, you will get an extra 15 seconds giving you a total of 3 minutes and 30 seconds. Trust us when we say this, those 15 seconds are a lot when you’re emptying the vault. It really helps!
So we recommend AVI if he’s unlocked for you, otherwise, go with PAIGE.
When you go for the hacking device, you can expect two different locations where it will be located. The first one requires you to get it from the N.O.O.S.E headquarters, while the second will have you grabbing it from the FIB building.
N.O.O.S.E Headquarters Mission
For the N.O.O.S.E headquarters mission, you need to go to a specific location, find the corrupt agent, take him out and take the keycard to the N.O.O.S.E headquarters. After that, head to the headquarters, sneak into the building and find the hacking device using your phone. It is pretty simple, just avoid the sight of the guards and walk silently and you should be good to go.
FIB Building Mission
If you get a mission where you need to go to the FIB building, you will first have to go kill some agents and get the FIB agent pass so you can impersonate that agent. Kill the agents, lose the cop and head to FIB building. Park your vehicle right in front of the entrance as it will be useful later on when you’re exiting.
Enter the building and, as always, avoid the cones of visions of other agents, as staying in them for a long time will cause you to expose your self. Keep walking and go to the elevator. After you reach the requisite floor, take your phone out and find the hacking device using the signal strength bar, the same way you did when in N.O.O.S.E headquarters.
Once you have acquired the hacking device, head back outside the same way you came in from. But note that as soon as you reach the exit, the agents will recognize you and start shooting, so make sure you have some snacks and armor. Quickly exit the building and get into your vehicle which you parked right in front of the entrance earlier (you’re welcome), lose the cops and deliver the hacking device back to the arcade.
TIP: One important tip we can give is to make sure you have your car parked right outside the door where you enter. As soon as you leave the building the guards will be alerted and you will have a wanted level, so quickly get out of there and lose the cops. If you have an Oppressor Mark II, then it’s even better as you can simply fly out of the area and lose your wanted level easily.
General Prep Work
There are only two general prep missions you need to do, the rest you can ignore for the big con approach. You can do the DUGGAN SHIPMENT mission that will make the guards in the finale considerably weaker. However, since we are not planning on getting into any combat situations, this mission is not necessary.
Vault Keycards
There can be two types of mission to acquire the vault keycards. One requires you to hijack a prison bus and get the keycard from one of the guards at the prison while you impersonate a prison guard. The second mission is fairly simple, you just need to go to two security guards situated at two different locations, kill them and get the cards. One guard will be drunk on the street while the other will be having “a good time” in a motel room. Just make sure that when you are taking them out, you use a suppressed weapon or kill them using a melee weapon to avoid cops.
Getting the vault keycards is the easiest prep mission. All you need to do is hijack a prisoner bus, head to the prison disguised as a prison guard and infiltrate one of the towers in the prison. Once you head inside the marked tower, you will come across a guard, just take out the guard silently and search his body for the keycards. After you’ve acquired the keycards, you can leave the prison the same way you came in using the prisoner bus and you are done.
Note that there is a faster way to do it as well, but it is not safe and we do not recommend doing it this way. You can go directly to the prison in your own vehicle and head to the tower to get the keycard. However, as you enter the premises, the guards are alerted and the snipers in the prison are very strong. They will annihilate you. Sometimes even one-shot killing you. So if you’re not careful and confident about this approach, it is best to play it safe and head in and get the keycard using the prison bus. This method can also work well if you have an Oppressor Mark II but nonetheless the snipers are still very dangerous.
Patrol Routes
This is an optional general prep mission, but it is one of the most important prep missions, especially for the Big Con approach. If you complete this mission you will be able to see the enemies or guards on your minimap during the heist. If you don’t do it, then the guards will not be visible on your map. It is absolutely necessary that you complete it, so you can easily see where the guards are doing the heist when approaching specific areas in stealth mode.
In this mission you need to find a specific car and take a photo of the contents of the trunk. The mission location is always different, but the cars are always the same, so you can never mistake the car for any other once you’ve identified it. There are two possible cars you can get – it can either be a gray colored car or a black colored car. You can either sneak your way to the car or just kill all the guards and approach the vehicle – it is completely up to you. Just make sure when you are going in killing everyone, not to accidentally blow up the target car!

You can see for this particular location, there is a black car (circled in green) right next to the gray car (circled in red). So when you arrive at this location it can be either one of these. It is applicable for other locations as well, you will always get either a gray colored car or a black colored car. The best part is that the model of these cars will be the exact same in all the locations, so once you’ve identified it you’ll know exactly what you’re looking for during your next run.

Security Pass
You need to acquire a Level 2 Security Pass or else you won’t be able to do the mission properly. The Security Pass mission is also one of the most essential optional missions. If you want to do everything the proper way, then you might as well consider acquiring a Level 2 Security Pass as a mandatory mission.
There are two different types of missions you can be given. One requires you to go to a pool party and get the card from the croupier. The other requires you to get it off of a dead valet’s body while you impersonate a Coroner officer.
Croupier / Party Method
For the first type of mission you will be instructed to go to a pool party. Once you reach the party, a suspicion bar, at the bottom right corner of your screen, will become visible. It will gradually increase if you become more noticeable and attract attention, however, you need to blend in and make sure it doesn’t rise. You can do different activities such as drinking and dancing to keep the suspicion bar low. Once Lester has identified the target, you need to find and search for the keycard on them. They will be passed out and once you search for the keycard you’ll discover it’s not actually on them. However, it should be laying around somewhere in the area. You need to search for the keycard around the area.
TIP: Your suspicion will still increase slightly, but the best way to keep it low is to go to your interaction menu and keep your action to dance, and turn it on permanently. This way you can walk around and search for the card while making sure the suspicion bar is not increasing.
Coroner Method
If you get a coroner mission, then you will need to go to the church and steal a hearse. Once you do so the cops will instantly be on you. Once you lose them, head to the coroner’s office. You will automatically equip the coroner officer’s clothes. Enter the office and proceed to the morgue. Avoid the cops’ cones of visions inside the office as much as you can. Once you reach the morgue, search valet’s body and get the keycard. Just ensure that no one is watching you while you do so. After that head back the same way you came in, while avoiding the cops. Leave the area to successfully complete the prep mission.
Big Con Prep
Entry Disguise
This is important, for entry disguise make sure you choose ‘Gruppe Sechs Gear’. When you choose this gear there will be two missions to perform to get the full gear. They will be called part 1 and part 2. In the first part you need to get the Gruppe Sechs Van. When you get to the location of the van it will be locked. You need to take out the mechanic and guards around the van and one of the mechanics will have the key to the van. Search the marked body for the key and get the van. You need to lose the cops after that and get the van back to the arcade.
In the second mission, or part 2, of the Gruppe Sechs Gear you need to go to Ginger Street. There will be a specific Gruppe Sechs stockade amongst many others. Take a picture of the license plate of that stockade and then grab the outfits in there and deliver them back to the arcade. Note that the area will be surrounded by guards, so you can do this mission either sneaking, or you can go in guns blazing. It is entirely up to you. There will be two outfits, so as stated earlier, if you have a friend with you, you can complete this mission in one run. But if you are doing this solo, you will need to come back and grab the other outfit.
TIP for part 1: We know that losing cops in the van is difficult so here’s a tip for you. Get the van and drive it to the arcade garage. It obviously won’t go inside since the cops are on you. But just leave it there and exit the van, then call in your personal vehicle or get any other pedestrian car. After you have the new car just lose the cops and then come back to the van and complete your mission. If you have an Oppressor Mark II, it makes it even easier, just call it in and get on it. Lose the cops and come back to the arcade to finish the mission.
General TIP: Some people are not able to see the ‘Gruppe Sechs Gear’ option under the entry disguise option on the prep board. In order for that option to appear you need to scope the security tunnel garage door during the casino scope out heist prep mission. The tunnel is to the right of the casino right beside the race track. This sewer tunnel grate is one of the many access points which you can scope out before the heist. Check out our full guide to all of the access points and points of interest.

Vault Drills
This one is a pretty straight forward mission. You simply need to go to the marked location and get the vault drills. You’ll face some resistance from cops because the vaults drills are in the possession of some criminals who they happen to be taking on too. You need to take them all out (the cops and the criminals) and get the drills. There will be two drills, so having a friend is recommended. But if you’re doing it solo, you can go and get the other drill after dropping the first one off at the arcade.
Exit Disguise
This is very important as well. You need to steal the NOOSE outfit if you want to exit the casino without any one noticing or attacking you. Head to the police station and get the NOOSE outfits. There will be two since you’ll be carrying out the heist finale with a minimum of two players. You’ll also receive a 4 star wanted level once you enter the restricted part of the police station, so be quick about it. Get the outfit and quickly head out, lose the cops and return to the arcade with your NOOSE outfit. You can return back and get the other one as well (or if you’re doing it with a friend just do it in one run).

Heist Finale
Final Prep Board
After you’re done with all the heist preparation, it is time to carry out the heist. Before we begin with the heist, let’s go over the final preparation board.
Entrance: For entrance you need to choose the SECURITY TUNNEL.
Entry Disguise: Your entrance disguise will be GRUPPE SECHS.
Exit: You need to choose the STAFF LOBBY as your exit.
Exit Disguise: Make sure you choose the NOOSE outfit as your exit disguise.
Buyer: Choosing the buyer is completely up to you. However, for better profit, it is recommended that you chose a ‘High Level’ buyer.
Clean Vehicle: You do not need to buy this.
Gunman Decoy: You do not need to buy this.

The Big Con Heist
Now that everything is set and ready, let’s move to the heist finale.
First, get into the Gruppe Sechs stockade with your friend and head to the casino as instructed by the game. Then head over to the security tunnel and enter the garage door. Drive ahead and you’ll come across the security check point. After a couple of seconds, you’ll proceed through and need to park the van in the marked spot.


After you’ve parked your van, it’s best to just take the elevator all the way down to the basement. Once you’ve reached the basement, make sure you do not have any weapons in your hands. So holster your weapon and casually walk towards the vault, passing through the security room. You will come across two keypads which need to be activated by you and your friend simultaneously. Communication between you two is very important. After you activate the keypads at the same time, enter the mantrap leading towards the vault.


Once you reach the vault, the guard will open it up, after which you must knock him out. This also signals the beginning of the actual robbery. If you chose PAIGE then you will have 3 minutes and 15 seconds. But if you chose AVI then you will have 3 minutes and 30 seconds to rob the vault. It is absolutely essential that you leave the vault before the timer runs out or else you’ll need to fight your way out and the whole ‘Big Con’ approach will basically fail. It’s good practice is to leave the vault when the timer hits the 30-40 seconds mark. This is much safer.


When you come across the fingerprint scanners, a good tip to know is that all the scanners will have the same fingerprint pattern. So if you’ve hacked one then make sure you remember the pattern on the first one, as all the other ones in the vault will have the same pattern. Trust us, this will really make your robbing process much faster. You can take a picture of the pattern on your real-lift phone the first time and then use it to quickly hack the next scanners.


When the timer reaches the 30-40 seconds mark, just leave the vault and head towards the mantrap. Once again, you and your friend need to swipe the cards at the same time. After that just head straight into the security room where you came from and back outside. DO NOT take the elevator. Instead, swipe your keycard on the staircase door and head through the staircase all the way up to the staff lobby area.


By the time you reach the top all the guards will be alerted and they will be looking for you. Once you are at the top, do not go through the door just yet. A guard will come by the door and then he will return back to the left hand side of the door. As soon as he goes back towards the left side, you and your friend must rush in stealth position through this door and straight through the door to the right. Once you go through this door, again wait here as there will be another guard passing by, as soon as he passes the door and moves to the right, you need to go through the door and take the guard out silently.


Once you’ve taken the guard out silently, turn around and go down the hallway. Here another guard will be patrolling, wait for him to turn back around, as soon as he turns back around, go to the room where your NOOSE outfits are. You will be able to see the clothes icon on your minimap. It will be the third door down the hallway. The other NOOSE outfit will be in the room next to this one, and your friend can get it from there. Once you have the outfits, exit out of the building through the STAFF LOBBY exit door. No guard will attack you now.
Heist Mechanic Updates
Since the time this guide was originally published there has been a small tweak where the route which you would usually take is now blocked. The exact location of the blockade is at the door which you take to your right after reaching the top of the stairs after exiting the basement. A straightforward workaround is to wait for the guard to come by, immediately leave the staircase section, and take the guard out silently.

Usually, we would wait for this guard to walk back the way he came from and then proceed to walk towards the door to the right. But now the door is blocked by a cleaning stand. After taking out the guard, just walk around the elevator and to the door on the right side. Be careful of the camera, which is on the other side. Hug the wall and stay clear of the cone of visions of these security cams.

Go through the door and this time, you will be able to head towards the corridor, which leads to the staff lobby. Before heading out stay clear of the door as it has a small glass window, and the guards can see you through it. There will be a guard coming towards you, and it is the same guard who you take out after going through the door in the original route.

Wait for the guard to turn around, quickly go ahead and silently take him out before he reaches the turn at the end of the corridor. If you miss, then head back inside and wait for the guard to come back.
Now, wait around the corner until the second guard turns around and rush towards the laundry room to get your N.O.O.S.E outfits. After this, you can proceed as normal.

The original route is still sometimes doable, but you should expect this updated route the majority of the time.


Once you’ve exited the casino through staff lobby, there’s a couple of other new changes outside as well.
You will now find another N.O.O.S.E van at the end of the right side of the race track with two N.O.O.S.E agents. Not only that, but there will be a number of agents all across the race track. It shouldn’t be an issue for you since you will be wearing the N.O.O.S.E outfit, but they will catch on to you as soon as you reach the lower end of the right side of the race track. So, be quick about it!

This is an important change for those who do not have N.O.O.S.E outfits as their exit disguise. In case you have something different, just hug the railing to the right side of the race track and keep running towards the end. Doing this, for some reason, renders you undetectable by the cones of vision of these N.O.O.S.E agents. After exiting the casino premises, proceed as normal.
Once you’re outside, quickly rush to the race track course from the staff lobby exit and stay on the right hand side of the track. Keep running until you come across a small descent to the right (at the end of the right side). After that jump over the fence and head outside. Please note that once you’re outside the casino premises, the cops will recognize you and you’ll have a 5 star wanted level, so be quick about this! Once you’ve jumped over the fence, quickly grab any pedestrian car and head into the sewer tunnel which is right beside the road.


Once inside the tunnel keep driving until you’re roughly in the middle of it and wait for your wanted level to go away. Once the wanted level is gone, keep driving until you come out of the other end and continue to drive to your buyer.


IMPORTANT: Do not get close to the casino after you’ve lost the cops. If you get close enough to the casino area after losing the cops, you will again receive a 5 star wanted level. So take a detour and a different route to the buyer, rather than going through the highway next to the casino.

Now just go to your buyer and after reaching them, you have successfully completed your casino heist!